Colour Management
For printed content
Why do I need colour management?
Using Pearson's recommended ICC profiles ensures our in-house creative teams and external vendors work to the same standards in a predictable and achievable colour gamut. This results in the output complying to our standards and delivering an expected, accurate result for both proofing and printing.
Colour Management Rules
Once your applications have had our colour profiles applied, there are some rules to follow for accurate colour reproduction to Pearson standards.
Pearson ICC Colour profiles
- CMYK - Coated FOGRA39
- RGB - Adobe RGB (1998)
Embed profiles when saving
When an RGB or CMYK file is created from an Adobe Creative Cloud application you will automatically be working to the Pearson recommended RGB and CMYK working colour spaces, Adobe RGB (1998) and Coated FOGRA39 respectively. When saving your final files make sure that you embed the correct profile into the file if this option is available. When the file is re-opened, this will ensures that irrespective of who uses it, where it has traveled and where it is output (in a colour managed application or workflow) the file will display or output the correct colours and numeric values for its intended purpose.
Colour Space and Conversion
The Pearson recommended colour settings allow the use of a mixed RGB and CMYK workflow for print.
It is acceptable to place CMYK images, RGB images or a mixture of both into an InDesign document as long as the Pearson colour settings have been applied correctly to Adobe Creative Suit (as explained earlier in this document).
Any RGB images will be converted to CMYK using the Pearson profiles when the PDF/X-1a is created.
Transparency Blend space
Adobe InDesign’s Transparency Blend Space needs to be set, this controls how elements on a page i.e. text, images, artwork and effects blend together when processing to a print ready PDF/X-1a file.
To ensure that your Adobe InDesign document Transparency Blend Colour Space is set to CMYK (not RGB), please do the following:
In Adobe InDesign go to Edit > Transparency Blend Space > CMYK
Spot Colours
Content containing spot or additional colours should be set up using Pantone spot colours from the native application colour pallet.
Soft proofing
You can create an on screen simulation of how your page or image will appear when printed, this works well but does have it limitations. For best results your monitor must be calibrated with the ambient light in your environment suitable for this process and the correct Application settings applied.
Application settings
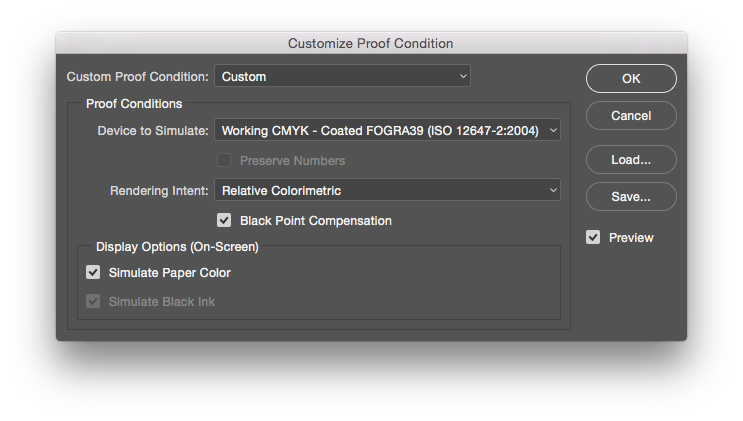
navigate to View > Proof Setup > Custom in any Adobe Creative Cloud application. The window will vary depending on which application you are using, but they are essentially all the same.
This is the Custom Proof Set up window from Photoshop displaying the correct working profile of FOGRA39

To activate 'soft proofing' select Proof Colours from the View menu.
Requires access to Self Service
Mac & Win for both Pearson and external vendors

